Admin Console - Upload DICOM Files
m (→Uploading) |
m |
||
| Line 17: | Line 17: | ||
Once an upload has completed it can take a few minutes for the study to be displayed on the admin console as the serverless system needs time to process the uploaded data. | Once an upload has completed it can take a few minutes for the study to be displayed on the admin console as the serverless system needs time to process the uploaded data. | ||
| − | ''Please note that the progress bars are currently based on the number of images you are uploading. Which means if you upload one large image the progress will sit at 0% until that image is uploaded, which means it can appear to be doing nothing ( on 0% ) and then just straight to 100%. If you upload 10 images, this would mean the progress bar will jump 10% for each image that has been uploaded successfully. | + | :'''<p>Please note that the progress bars are currently based on the number of images you are uploading. Which means if you upload one large image the progress will sit at 0% until that image is uploaded, which means it can appear to be doing nothing ( on 0% ) and then just straight to 100%. If you upload 10 images, this would mean the progress bar will jump 10% for each image that has been uploaded successfully.</p>This will be fixed in a future release to show progress based on the total size of the data being uploaded.''' |
| − | + | ||
| − | + | ||
<gallery> | <gallery> | ||
Revision as of 15:22, 14 October 2014
In order to get files onto the serverless system you will need to upload them from your local machine.
The only file type that is currently handled is DICOM files, any files that are uploaded that are of an invalid file type will be ignored by the system.
Once files have been uploaded they will show to all users within your account group, but they will not show for other serverless users until they are specifically transferred. See here for how to send studies to other accounts.
Uploading
DICOM files can be uploaded through the admin console when using serverless bbRad/exoPACS. Uploads are only possible via the "Study List" screen.
When selecting a directory, it will try to upload all DICOM files within the selected folder. Therefore if several studies are present in one folder they can all be uploaded at once. Likewise single DICOM files can be uploaded if they're selected individually.
Clicking the "Upload" button on the left hand side will prompt the user to select the folder/files that are to be uploaded. Once submitted the upload/download manager window should appear, this will list the progress of any on-going uploads that are taking place. Items can be cancelled from this list, by clicking the cancel button, note that this will terminate the current upload progress and if the same files are then re-uploaded they will start from 0%. Once an upload has completed it can be removed from the list by clicking the remove button for the relevant study, this will simply remove that upload information from the manager, it will not affect the study data that you sent to the serverless system.
Once an upload has completed it can take a few minutes for the study to be displayed on the admin console as the serverless system needs time to process the uploaded data.
Please note that the progress bars are currently based on the number of images you are uploading. Which means if you upload one large image the progress will sit at 0% until that image is uploaded, which means it can appear to be doing nothing ( on 0% ) and then just straight to 100%. If you upload 10 images, this would mean the progress bar will jump 10% for each image that has been uploaded successfully.
This will be fixed in a future release to show progress based on the total size of the data being uploaded.
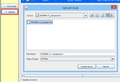
Upload files dialog
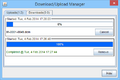
Upload manager


Auto send to account after upload

It is possible to have the uploaded files automatically sent to another users account.
This is done during the upload, after selecting the files that are too be uploaded the user will be prompted for a destination. The default value will be "Upload" this will upload the study ONLY to the serverless system, it will NOT be sent anywhere, it would need to be manually sent to another account.
Listed in the drop down menu will also be the other accounts that you have access to send to, if you select one of these accounts then your uploaded study will be uploaded and then automatically transferred across to the account that you selected. This means that you would not need to manually sent the studies to the account after they have been uploaded.